15 Easy Lunar New Year Crafts for Kids

If you want your kids to join in Lunar New Year without buying a kit, these crafts use paper, markers, and things you likely have at home. Each one has a short supply list, clear steps, and a tip. The projects range from quick folding to hands-on painting.
What Is Lunar New Year? A Kid-Friendly Explanation
Lunar New Year is a spring festival celebrated in China and many other countries. It follows the lunar calendar, so the date moves each year. In 2027 it starts on February 6, and the celebrations run about two weeks. The Lantern Festival closes things on February 20, 2027.
Families clean their homes, share meals, and give gifts. Red is the color of good luck, dragons stand for power, and lanterns light the way. Each new year is linked to one of twelve zodiac animals, and 2027 is the Year of the Goat.
Materials You Need for Lunar New Year Crafts
Most projects use the same basics: red and gold paper, cardstock, tissue paper, markers, washable paint, glue sticks or white school glue, tape, scissors, string, popsicle sticks, paper plates, and paper fasteners. Plain white school glue holds paper crafts well enough for young kids, so we never needed a hot glue gun.
Parent tipHand younger kids blunt-tip scissors and keep any step with staples or eye holes for an adult.
| Best ages | Crafts | Time |
|---|---|---|
| 3+ | Cherry blossom art, handprint dragon | 15-20 min |
| 4+ | Plate dragon, zodiac masks, firecracker garland, paper fan, lion dance mask, gold coin tree | 15-25 min |
| 5+ | Lanterns, red envelopes, fish mobile, good luck banner, plate drum | 15-25 min |
| 6+ | Zodiac spinner, fortune cookies | 15-30 min |
Lunar New Year Crafts for Kids
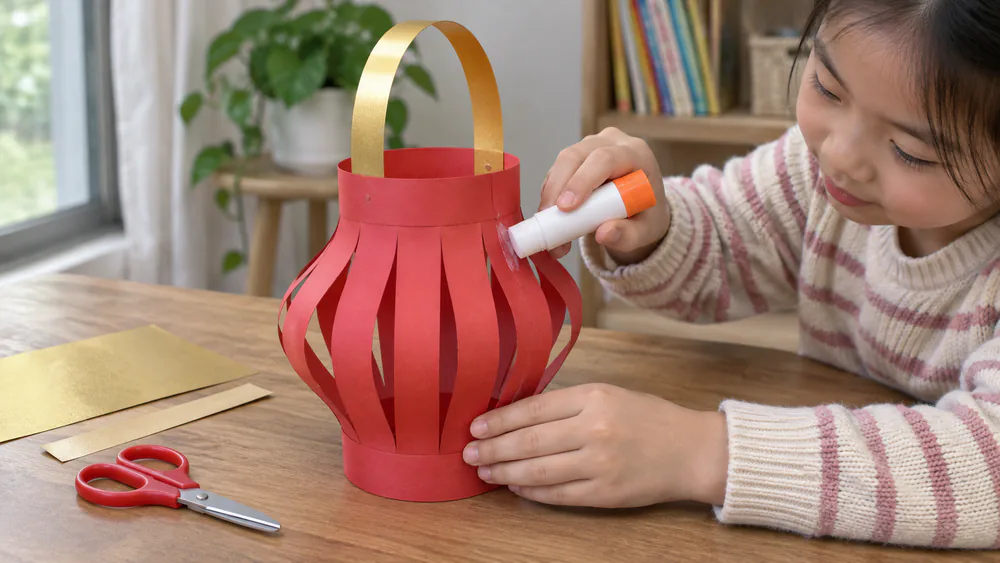
1. Paper Lanterns
Paper lanterns are the classic Lunar New Year decoration, and kids love how a flat sheet turns into something that stands up. Cutting the slits is good scissor practice, though younger kids need patience.
You need: red or patterned paper, scissors, a glue stick, a strip of paper for the handle, a ruler.
- Fold the sheet in half the long way.
- Draw a line about 1 inch from the open edge, then cut evenly spaced slits from the fold up to that line.
- Unfold, roll it into a cylinder with the slits on the outside, and glue the short edges.
- Glue a paper strip across the top as a handle.
Ages 5+, about 15 minutes, low cost. Tip: stop every slit at the line, because cutting through leaves the lantern in pieces.
2. Paper Plate Dragon
A paper plate dragon with streamers on a stick leads naturally into a dance parade around the room, which is why it is perfect for a dragon puppet.
You need: a paper plate, red or gold paint, googly eyes, streamers, glue, a marker, a popsicle stick.
- Paint the plate red or gold and let it dry.
- Draw a mouth, then glue on the googly eyes.
- Glue streamers to the back as a tail.
- Tape a stick to the back so kids can hold the dragon up.
Ages 4+, about 25 minutes plus drying, low cost. Tip: let the paint dry fully before gluing, or the eyes slide off. Older kids can add paper scales or a long ribbon tail, and younger ones can simply choose the colors and stick on the eyes.
3. Lucky Red Envelopes (Hongbao)
Red envelopes are called hongbao in Mandarin and lai see in Cantonese, and they hold gift money for good fortune. Kids enjoy making their own and filling them with a wish or a small treat.
You need: red paper, a gold marker, glue, a ruler.
- Cut a rectangle about twice as tall as it is wide.
- Fold the bottom third up.
- Glue the sides, leaving the top open, then fold a flap down.
- Decorate with the gold marker and slip a wish or treat inside.
Ages 5+, about 15 minutes, low cost. Tip: glue only the sides so the pouch still opens.
NoteRed envelopes are traditionally given to children for good luck. Making them is a nice way to talk about sharing good wishes.
4. Zodiac Animal Masks
Each year belongs to one of twelve zodiac animals, so a mask lets a child become their own birth-year animal. It is a quick project with plenty of room for personal touches.
You need: paper plates or cardstock, markers, scissors, popsicle sticks.
- Look up your child's birth year in a zodiac chart to find their animal (2027, for example, is the Goat).
- Draw the animal face on a plate or cardstock.
- Cut out eye holes, with an adult helping.
- Color the mask and tape it onto a stick.
Ages 4+, about 20 minutes, low cost. Tip: hold the plate up to your child's face before cutting, since eye holes placed too far apart are hard to see through. Let your child pick the animal and color it any way they like, because a purple tiger is just as fun as a real one.
5. Cherry Blossom Branch Art
Blossoms stand for new beginnings, and this craft is gentle on small fingers. Glued crumpled-tissue blossoms come together fast, and crafts like this look messy but personal touches make them feel special.
You need: brown paint or paper, white paper, pink tissue paper, glue.
- Paint or glue a brown branch across the white paper.
- Crumple small pink tissue squares into balls.
- Dot glue along the branch.
- Press the tissue balls on as blossoms.
Ages 3+, about 15 minutes, low cost. Tip: go light on the glue, because too much soaks through the tissue. Mixing pink and white tissue gives the branch a fuller look, and the finished picture can be taped up on a window.
6. Paper Firecracker Garland
Red paper firecrackers are a safe, noise-free way to bring the festive look into a room. Kids enjoy rolling the tubes and lining them up in a long row.
You need: red paper, yellow tissue paper, a gold marker, glue, string.
- Roll red paper into tubes and glue each one closed.
- Glue a bit of yellow tissue to one end as the fuse.
- Decorate each tube with the gold marker.
- Thread the tubes onto string, or tape them in a row.
Ages 4+, about 25 minutes, low cost. Tip: make a big batch of tubes first, then hang them along a window or doorway for a bright garland. Younger children can handle the gluing and gold marker work while an older sibling threads the string, so everyone has a job.
7. Handprint Dragon
The scales on a handprint dragon turn into a keepsake that shows how small your kids' hands were. It is messy, so cover the table first and expect paint on hands.
You need: washable paint, paper, a marker, a googly eye.
- Paint a child's palm and press it onto the paper.
- Repeat in a curved line to build the dragon's body.
- Add a head, an eye, and a tail.
- Draw spikes or flames with the marker.
Ages 3+, about 20 minutes, low cost. Tip: wipe hands between colors so the paint stays bright. Keep a damp cloth and a tray of paint close by, and let each handprint dry flat before you move the paper.

8. Paper Fans
An accordion-folded paper fan works as a real fan on a warm day, which makes it a craft kids keep using long after the festival. Decorate the paper first, since flat paper is easier to color.
You need: red paper, markers, tape, a popsicle stick.
- Decorate the sheet first.
- Fold it back and forth in folds about 1 inch wide, like an accordion.
- Pinch one end together and tape it in place, or tape a popsicle stick over it as a handle.
- Squeeze the pinched end and spread the open end out into a half-circle.
Ages 4+, about 15 minutes, low cost. Tip: keep the folds narrow and even so the fan opens smoothly. For a sturdier fan, use cardstock instead of thin paper, and let your child color both sides in red and gold, then test it together.
9. Lion Dance Mask
Lion dancers bring good luck to festival parades, and this mask lets kids join in. A tissue or yarn mane gives it a shaggy, fun look.
You need: a paper plate, yellow or orange paint, tissue paper or yarn, a popsicle stick.
- Paint the plate yellow or orange.
- Glue a mane of tissue or yarn around the edge.
- Cut eye holes, with an adult helping.
- Tape a stick to the back of the plate.
Ages 4+, about 25 minutes plus drying, low cost. Tip: pair it with the drum from craft 15 for a full parade. Cut the eye holes a little wide so your child can see where they are walking while they dance around the room.
10. Lucky Fish Mobile
Fish stand for abundance, so a mobile of paper fish makes a cheerful good luck decoration. Kids like decorating each scale and watching the fish swing.
You need: orange or gold paper, markers, a hole punch, string, a hanger or stick.
- Cut out several fish shapes.
- Add scales with markers.
- Punch a hole at the top of each fish.
- Tie each fish to a hanger on strings of different lengths.
Ages 5+, about 25 minutes, low cost. Tip: vary the string lengths so the fish hang at different heights and do not tangle. Hang the mobile near a window or doorway so a small breeze makes the fish swing and the scales catch the light.
11. Zodiac Wheel Spinner
Zodiac wheel spinners hold attention because kids spin to find their own birth-year animal. It also helps them learn all twelve animals in order.
You need: two paper plates or cardstock circles, markers, a paper fastener, a paper arrow.
- Fold one circle in half, then in half again, then open it and fold it into thirds, so the creases mark 12 sections.
- Draw one zodiac animal in each section, along the creases.
- Cut out a paper arrow.
- Attach the arrow at the center with a paper fastener.
Ages 6+, about 30 minutes, low cost. Tip: leave the fastener loose enough that the arrow spins freely. Write each animal's name beside its picture so younger children can match names and faces as they play with the finished spinner, and take turns spinning.
12. Gold Coin Tree
Gold stands for wealth and good fortune, and this tree is a pretty way to hang up wishes for the new year. Cutting coins is easy practice for fine motor skills.
You need: gold paper, brown paper or paint, glue, scissors.
- Make a tree trunk with branches from brown paper or paint.
- Cut out gold circles.
- Glue the coins onto the branches.
- Write a wish on some of the coins.
Ages 4+, about 20 minutes, low cost. Tip: draw circles around a bottle cap so younger kids have a shape to cut along. Hang the finished tree on a wall, and add a few extra coins on each day of the festival.
13. Paper Fortune Cookies
Fortune cookies are not a traditional Lunar New Year item, but kids enjoy writing little messages of good luck. Treat this as a fun extra for the craft table.
You need: paper circles, small paper strips, a pen, tape or glue.
- Write a fortune on a paper strip.
- Lay the strip on the circle and fold the circle in half over it.
- Bend the folded edge over the rim of a cup.
- Tuck the two corners together and tape them.
Ages 6+, about 15 minutes, low cost. Tip: expect a slight bend in the paper as you shape it, and do not press too hard. Make a handful with different fortunes, such as a wish for health or a kind word for a friend, and share them at the table.
14. Good Luck Banner
The character fu means luck and happiness. Kids can write it on a banner, or use greetings like Xin Nian Kuai Le (Happy New Year) and Gong Xi Fa Cai (wishing you prosperity).
You need: red paper, a gold marker, string, tape.
- Cut the paper into diamonds or long strips.
- Write the fu character or a greeting on each piece.
- Decorate with the gold marker.
- String the pieces together and hang them up.
Ages 5+, about 20 minutes, low cost. Tip: have your child copy the character slowly from a printed example. Hang the banner above a doorway or across a window so the whole family sees the good wishes each time they pass.
15. Paper Plate Drum
A rattle drum is loud in a fun way and ends the list with a parade. Kids twirl the handle and the beads tap the plates.
You need: two paper plates, beads, string, a stapler, a popsicle stick.
- Draw or paint dragon scales, stars, or swirls on the plates, and let any paint dry before you staple.
- Tie beads onto lengths of string.
- Staple the plates together with the strings inside.
- Twirl the stick to rattle the drum.
Ages 5+, about 25 minutes, low cost. Tip: staples are a job for an adult. Shake it, twirl it, and march with it in time to music, because the beads make a surprisingly satisfying rattle.
Tips for Making Lunar New Year Crafts With Kids
Set out all supplies before you start, and cover the table for painting projects. Start with the easier projects, like the paper fan or the red envelope, and save the zodiac spinner for older kids.
NoteThe paper fan was the one that kept getting used. It works as a real fan on a warm day, so it stays in use well after the craft is done.
Parent tipDo painting crafts first and gluing crafts second, so wet paint never meets a finished project.
How to Teach Lunar New Year Respectfully
Talk about the festival as a living tradition, not just a theme. Explain what each symbol means before you craft it, and use the right names, like hongbao for red envelopes. You can read more about what Lunar New Year celebrates together before you begin.
Frequently Asked Questions
What are easy Lunar New Year crafts for kids?
The paper fan and the red envelope are the easiest. They use paper, markers, and glue, and most crafts here take about 15 to 25 minutes.
What is the difference between Lunar New Year and Chinese New Year?
They mark the same festival. Lunar New Year is the broader name, since many countries and cultures celebrate it, while Chinese New Year refers to the Chinese celebration.
What age can start these crafts?
Handprint dragon and blossom art suit ages 3 and up, and most others start at 4 or 5. Save the zodiac spinner and fortune cookies for ages 6 and up.
Conclusion
Lunar New Year crafts are a simple way to bring a festival into your home. The paper fan and the red envelope are a good place to begin.